」")
ノート: 個人的に使用する webdav server を構築したときのメモです。信頼されたルート証明機関、サーバー証明書は自己証明書(オレオレ証明書)を 使います。
このページは ubuntu 14.04 または 16.04 とその派生ディストリビューション上で apache2.4 を使用して webdav server を構築する手順のメモです。ここでは https プロトコル接続ポートは標準の 443 番に代えて 50443 番を使用する設定をします。次は構築を行った環境の概要です。
コマンド表記は先頭が # あるいは /path/to/directory # の様に書かれてい場合は root あるいは相当する権限で実行することを意味します。 /path/to/directory は作業中のカレントディレクトリです。
先頭が > で始まるコマンドは Windows PC 上の cmd コマンドコンソールで実行する内容です。Power Shell を使うとコマンドの解釈や実行結果が異なることがあります。Power Shell より cmd を起動して下さい。
設定が完了するまでの流れは次の通りです。順番に行っていけば webdav server を client からアクセスできるようになります。
apache 2.4 と openssl をインストールします。openssl は既にインストール済みかと思います。
/home/www-data ディレクトリ以下に webdav server に必要なディレクトリを作成することにします。
| directory | owner | permission | contents |
|---|---|---|---|
|
|
|
|
apache2.4 の uid, gid でアクセスできるホーム・ディレクトリ。 |
|
|
www-data:www-data | 750 | webdav server に使うディレクトリを集約するディレクトリ。 |
|
|
root:www-data | 750 | webdav server に使う設定ファイルを格納するディレクトリ。証明書、証明書の秘密キー、ログインパスワードを格納します。 |
|
|
www-data:www-data | 750 | webdav server にアクセスした記録を保存するディレクトリ。 |
|
|
www-data:www-data | 750 | webdav server で共有するファイルやディレクトリのロック状況を保持するファイル DAVLock が置かれるディレクトリです。既定の ${APACHE_LOCK_DIR}/DAVLock (APACHE_LOCK_DIR を展開すると /var/lock/apache2/DAVLock) のままで良ければ、このディレクトリを作らなくても(使わなくても)良いです。 |
|
|
www-data:www-data | 750 | webdav server の DocumentRoot ディレクトリ。次の share ディレクトリ以下を共有ディレクトリとします。 |
|
|
www-data:www-data | 750 | webdav server で共有するディレクトリ。 |
/usr/lib/ssl/openssl.cnf (シンボリックリンク先は /etc/ssl/openssl.cnf です) に設定された certification authority による署名作業用のファイル配置に従ってディレクトリ、ファイルを作成します。openssl.cnf の [ CA_default ] セクション に書かれた内容を確認します。less または sed などを利用して下さい。
| directory | owner | permission | contents |
|---|---|---|---|
|
|
|
|
信頼されたルート証明機関の署名 {公開キー、秘密キー} と署名した証明書の記録を格納します。 |
|
|
root:root | 700 | 署名した証明書の記録を格納します。 |
|
|
root:root | 700 | Certification Revocation List, 署名を破棄した証明書(その写し)の記録を格納します。 |
|
|
root:root | 700 | 署名した証明書(その写し)が格納されます。 |
|
|
root:root | 700 | ルート証明機関の秘密キーを格納する場所です。このページの操作ではこのディレクトリに格納されるファイル、ディレクトリはありません。 |
|
|
root:root | 600 | 署名記録のインデックスです。署名する(あるいは破棄などの操作をする)と更新されます。 |
|
|
root:root | 600 | 署名の連番です。2N 桁 (N = 1, 2, 3, ...) の 16 進数で格納されます。 |
「おれおれ」信頼されたルート証明機関の証明書を作成します。鍵の対を作成、証明機関の情報を入力、自己署名を行います。openssl コマンドを使って作業します。
鍵の対を生成します。参考: openssl genrsa
# cd /home/www-data/root-ca
/home/www-data/root-ca # openssl genrsa -out my-root-ca.key 2048
証明機関の情報を入力します。参考: openssl req
/home/www-data/root-ca # openssl req -new -key my-root-ca.key -out my-root-ca.csr
You are about to be asked to enter information that will be incorporated
into your certificate request.
What you are about to enter is what is called a Distinguished Name or a DN.
There are quite a few fields but you can leave some blank
For some fields there will be a default value,
If you enter '.', the field will be left blank.
-----
Country Name (2 letter code) [AU]:JP  # 大文字で 2 文字国コード
State or Province Name (full name) [Some-State]:Todoufuken  # 日本であれば都道府県名
Locality Name (eg, city) []:ShiChouSon  # 市町村名
Organization Name (eg, company) [Internet Widgits Pty Ltd]:Hello World Company  # 会社名(屋号)
Organizational Unit Name (eg, section) []:Certification Service Division  # 部署名など
Common Name (e.g. server FQDN or YOUR name) []:Your Name   # FQDN または 署名者
Email Address []:your-name@mail.example.com  # メールアドレス
Please enter the following 'extra' attributes
to be sent with your certificate request
A challenge password []:  # 何も入力しない
An optional company name []:My family use  # 何も入力しないか、分かりやすくするためのちょっとした説明
ノート: 「おれおれ」信頼されたルート証明機関なので、関係者に分かる程度の内容で良いです。会社名や部署名などは適当に付けても問題ないです。
ノート: もし、自分のサイトの FQDN (www.mysite.com の様なアドレス) を持っているならば「おれおれ」信頼されたルート証明機関の証明書の Common Name (e.g. server FQDN or YOUR name) はその FQDN を入力した方が良いかもしれません。
ノート: A challenge password に何か入力すると署名作業の度にパスワード入力が必要なになるか、その回避策が必要になります。
自己署名します。参考: openssl x509
/home/www-data/root-ca # openssl x509 -days 7400 -req -signkey my-root-ca.key -in my-root-ca.csr -out my-root-ca.crt
ノート: -days の後は署名の有効期間です。365 で 1 年、7300 で約 20 年です。7400 としているのは、署名しようとするサーバー証明書の有効期間 7300 よりも少し長めにする目的があります。もし、ルート証明機関の証明書の有効期間 < サーバー証明書の有効期間 でも大きな問題は起きないようです。
アクセスモードを設定します。「おれおれ」信頼されたルート証明機関なので過剰かもしれません。
/home/www-data/root-ca # chmod 600 my-root-ca.key my-root-ca.csr my-root-ca.crt
各ファイルの内容確認は次の様にします。参考: openssl rsa
/home/www-data/root-ca # openssl rsa -text -in my-root-ca.key -noout  # 鍵の対表示
/home/www-data/root-ca # openssl req -text -in my-root-ca.csr -noout  # 証明機関の情報表示
/home/www-data/root-ca # openssl x509 -text -in my-root-ca.crt -noout  # 署名された証明書を表示
webdav server の証明書を作成します。鍵の対を作成、サーバーの情報を入力、「おれおれ」信頼されたルート証明機関の鍵で署名を行います。
webdav server の鍵の対を作成します。参考: openssl genrsa
# cd /home/www-data/webdav/config
/home/www-data/webdav/config # openssl genrsa -out webdav-server.key 2048
webdav server の情報を入力します。参考: openssl req
/home/www-data/webdav/config # openssl req -new -key webdav-server.key -out webdav-server.csr
You are about to be asked to enter information that will be incorporated
into your certificate request.
What you are about to enter is what is called a Distinguished Name or a DN.
There are quite a few fields but you can leave some blank
For some fields there will be a default value,
If you enter '.', the field will be left blank.
-----
Country Name (2 letter code) [AU]:JP  # 大文字で 2 文字国コード
State or Province Name (full name) [Some-State]:Todoufuken  # 日本であれば都道府県名
Locality Name (eg, city) []:ShiChouSon  # 市町村名
Organization Name (eg, company) [Internet Widgits Pty Ltd]:Hello World Company  # 会社名(屋号)
Organizational Unit Name (eg, section) []:Storage Service Division  # 部署名など
Common Name (e.g. server FQDN or YOUR name) []:hostname   # ホスト名、FQDN、または 署名者
Email Address []:your-name@mail.example.com  # メールアドレス
Please enter the following 'extra' attributes
to be sent with your certificate request
A challenge password []:  # 何も入力しない
An optional company name []:My family use  # 何も入力しないか、分かりやすくするためのちょっとした説明
ノート: 関係者に分かる程度の内容で良いです。会社名や部署名などは適当に付けても問題ないです。
ノート: Common Name (e.g. server FQDN or YOUR name) には webdav サーバーにローカルネット(直接接続しているサブネット)からアクセスする場合はローカルネット内ホスト名(NETBIOS 名など)、webdav サーバーにインターネットを経由してアクセスするならば FQDN (webdav.mysite.com の様なアドレス) を指定して下さい。
ノート: A challenge password に何か入力すると apache 起動の度にパスワード入力が必要なになるか、その回避策が必要になります。
「おれおれ」信頼されたルート証明機関の鍵で署名します。ルート証明機関の署名記録を付けるため /home/www-data/root-ca ディレクトリにカレントディレクトリを移動して操作します。-days オプションのパラメータが有効期間です。7300 で約 20 年です。参考: openssl ca
/home/www-data/webdav/config # cd ../../root-ca  # あるいは絶対パスを使い cd /home/www-data/root-ca
/home/www-data/root-ca # openssl ca -days 7300 -cert my-root-ca.crt -keyfile my-root-ca.key \
-in ../webdav/config/webdav-server.csr -out ../webdav/config/webdav-server.crt
Using configuration from /usr/lib/ssl/openssl.cnf
Check that the request matches the signature
Signature ok
Certificate Details:
        Serial Number: 1 (0x1)
        Validity
            Not Before: Feb 26 07:09:03 2018 GMT
            Not After : Feb 21 07:09:03 2038 GMT
        Subject:
            countryName               = JP ここに示されている情報は入力例です
            stateOrProvinceName       = Todoufuken
            organizationName          = Hello World Company
            organizationalUnitName    = Storage Service Division
            commonName                = davhost3
            emailAddress              = afuruta@m7.dion.ne.jp
        X509v3 extensions:
            X509v3 Basic Constraints:
                CA:FALSE
            Netscape Comment:
                OpenSSL Generated Certificate
            X509v3 Subject Key Identifier:
                6B:BA:99:E1:CF:96:96:7E:92:39:BD:7E:B9:4F:22:4D:BF:58:AC:6A
            X509v3 Authority Key Identifier:
                DirName:/C=JP/ST=Chiba/L=ShiChouSon/O=Hello World Company/OU=Certification Service Division/CN=www.ftechworks.mydns.jp/emailAddress=afuruta@m7.dion.ne.jp
                serial:EB:88:0E:ED:6D:BF:C7:90
Certificate is to be certified until Feb 21 07:09:03 2038 GMT (7300 days)
Sign the certificate? [y/n]:y
1 out of 1 certificate requests certified, commit? [y/n]y
Write out database with 1 new entries
Data Base Updated
webdav server の証明書ファイルのオーナー、グループ、アクセスモードを設定します。
/home/www-data/root-ca # cd ../webdav/config  # あるいは絶対パスを使い cd /home/www-data/webdav/config
/home/www-data/webdav/config # chown root:www-data webdav-server.key webdav-server.csr webdav-server.crt
/home/www-data/webdav/config # chmod 640 webdav-server.key webdav-server.csr webdav-server.crt
各ファイルの内容確認は次の様にします。参考: openssl rsa
/home/www-data/webdav/config # openssl rsa -text -in webdav-server.key -noout  # 鍵の対表示
/home/www-data/webdav/config # openssl req -text -in webdav-server.csr -noout  # webdav server の情報表示
/home/www-data/webdav/config # openssl x509 -text -in webdav-server.crt -noout  # 署名された証明書を表示
webdav サーバー設定ファイル /etc/apache2/sites-available/webdav-ssl.conf を作成します。/etc/apache2/sites-available の下にある default-ssl.conf をひな形に作成します。webdav-ssl.conf の例をダウンロードするか、 コマンドラインで default-ssl.conf をコピーして編集してください。
# cd /etc/apache2/sites-available  # default-ssl.conf をコピーして編集する場合
/etc/apache2/sites-available # cp default-ssl.conf webdav-ssl.conf
/etc/apache2/sites-available # nano webdav-ssl.conf
<IfModule mod_ssl.c>
	<VirtualHost _default_:50443> # 接続ポート番号を 50443 に変えています
		ServerAdmin yournamre@mail.example.com # 管理者のメールアドレス
		DocumentRoot /home/www-data/webdav/root # webdav server の root ディレクトリ、この下に share ディレクトリを置きます
		# Available loglevels: trace8, ..., trace1, debug, info, notice, warn,
		# error, crit, alert, emerg.
		# It is also possible to configure the loglevel for particular
		# modules, e.g.
		#LogLevel info ssl:warn
		ErrorLog  /home/www-data/webdav/logs/error.log # アクセス頻度が高いので logrotate or rotatelogs の併用をお勧めします
		CustomLog /home/www-data/webdav/logs/access.log combined # アクセス頻度が高いので logrotate or rotatelogs の併用をお勧めします
		# For most configuration files from conf-available/, which are
		# enabled or disabled at a global level, it is possible to
		# include a line for only one particular virtual host. For example the
		# following line enables the CGI configuration for this host only
		# after it has been globally disabled with "a2disconf".
		#Include conf-available/serve-cgi-bin.conf
		#   SSL Engine Switch:
		#   Enable/Disable SSL for this virtual host.
		SSLEngine on # on になっていることを確認
		#   A self-signed (snakeoil) certificate can be created by installing
		#   the ssl-cert package. See
		#   /usr/share/doc/apache2/README.Debian.gz for more info.
		#   If both key and certificate are stored in the same file, only the
		#   SSLCertificateFile directive is needed.
		SSLCertificateFile	/home/www-data/webdav/config/webdav-server.crt # サーバー証明書
		SSLCertificateKeyFile	/home/www-data/webdav/config/webdav-server.key # 鍵の対
		#   Server Certificate Chain:
		#   Point SSLCertificateChainFile at a file containing the
		#   concatenation of PEM encoded CA certificates which form the
		#   certificate chain for the server certificate. Alternatively
		#   the referenced file can be the same as SSLCertificateFile
		#   when the CA certificates are directly appended to the server
		#   certificate for convinience.
		#SSLCertificateChainFile /etc/apache2/ssl.crt/server-ca.crt
		#   Certificate Authority (CA):
		#   Set the CA certificate verification path where to find CA
		#   certificates for client authentication or alternatively one
		#   huge file containing all of them (file must be PEM encoded)
		#   Note: Inside SSLCACertificatePath you need hash symlinks
		#		 to point to the certificate files. Use the provided
		#		 Makefile to update the hash symlinks after changes.
		#SSLCACertificatePath /etc/ssl/certs/
		#SSLCACertificateFile /etc/apache2/ssl.crt/ca-bundle.crt
		#   Certificate Revocation Lists (CRL):
		#   Set the CA revocation path where to find CA CRLs for client
		#   authentication or alternatively one huge file containing all
		#   of them (file must be PEM encoded)
		#   Note: Inside SSLCARevocationPath you need hash symlinks
		#		 to point to the certificate files. Use the provided
		#		 Makefile to update the hash symlinks after changes.
		#SSLCARevocationPath /etc/apache2/ssl.crl/
		#SSLCARevocationFile /etc/apache2/ssl.crl/ca-bundle.crl
		#   Client Authentication (Type):
		#   Client certificate verification type and depth.  Types are
		#   none, optional, require and optional_no_ca.  Depth is a
		#   number which specifies how deeply to verify the certificate
		#   issuer chain before deciding the certificate is not valid.
		#SSLVerifyClient require
		#SSLVerifyDepth  10
		#   SSL Engine Options:
		#   Set various options for the SSL engine.
		#   o FakeBasicAuth:
		#	 Translate the client X.509 into a Basic Authorisation.  This means that
		#	 the standard Auth/DBMAuth methods can be used for access control.  The
		#	 user name is the `one line' version of the client's X.509 certificate.
		#	 Note that no password is obtained from the user. Every entry in the user
		#	 file needs this password: `xxj31ZMTZzkVA'.
		#   o ExportCertData:
		#	 This exports two additional environment variables: SSL_CLIENT_CERT and
		#	 SSL_SERVER_CERT. These contain the PEM-encoded certificates of the
		#	 server (always existing) and the client (only existing when client
		#	 authentication is used). This can be used to import the certificates
		#	 into CGI scripts.
		#   o StdEnvVars:
		#	 This exports the standard SSL/TLS related `SSL_*' environment variables.
		#	 Per default this exportation is switched off for performance reasons,
		#	 because the extraction step is an expensive operation and is usually
		#	 useless for serving static content. So one usually enables the
		#	 exportation for CGI and SSI requests only.
		#   o OptRenegotiate:
		#	 This enables optimized SSL connection renegotiation handling when SSL
		#	 directives are used in per-directory context.
		#SSLOptions +FakeBasicAuth +ExportCertData +StrictRequire
		<FilesMatch "\.(cgi|shtml|phtml|php)$">
				SSLOptions +StdEnvVars
		</FilesMatch>
		<Directory /usr/lib/cgi-bin>
				SSLOptions +StdEnvVars
		</Directory>
		#   SSL Protocol Adjustments:
		#   The safe and default but still SSL/TLS standard compliant shutdown
		#   approach is that mod_ssl sends the close notify alert but doesn't wait for
		#   the close notify alert from client. When you need a different shutdown
		#   approach you can use one of the following variables:
		#   o ssl-unclean-shutdown:
		#	 This forces an unclean shutdown when the connection is closed, i.e. no
		#	 SSL close notify alert is send or allowed to received.  This violates
		#	 the SSL/TLS standard but is needed for some brain-dead browsers. Use
		#	 this when you receive I/O errors because of the standard approach where
		#	 mod_ssl sends the close notify alert.
		#   o ssl-accurate-shutdown:
		#	 This forces an accurate shutdown when the connection is closed, i.e. a
		#	 SSL close notify alert is send and mod_ssl waits for the close notify
		#	 alert of the client. This is 100% SSL/TLS standard compliant, but in
		#	 practice often causes hanging connections with brain-dead browsers. Use
		#	 this only for browsers where you know that their SSL implementation
		#	 works correctly.
		#   Notice: Most problems of broken clients are also related to the HTTP
		#   keep-alive facility, so you usually additionally want to disable
		#   keep-alive for those clients, too. Use variable "nokeepalive" for this.
		#   Similarly, one has to force some clients to use HTTP/1.0 to workaround
		#   their broken HTTP/1.1 implementation. Use variables "downgrade-1.0" and
		#   "force-response-1.0" for this.
		# BrowserMatch "MSIE [2-6]" \
		#		nokeepalive ssl-unclean-shutdown \
		#		downgrade-1.0 force-response-1.0
		#
		# If webdav client cause an error by response 301 (Moved Permanently),
		# use BrowserMatch "Regex to match Browser Identifier" redirect-carefully
		BrowserMatch "^Microsoft[-]WebDAV" redirect-carefully # 301 レスポンスで不調になる場合の対策
		<Location "/share"> # share 共有ディレクトリの設定
			Options +Indexes # 古い Windows client は +Indexes で不調になるかもしれない
			Dav On # webdav を使う指定
			DavDepthInfinity on # ディレクトリ探索深さ制限は無しにしています
			AuthType Digest # digest 認証を使います。パスワードファイル操作に htdigest を使います
			AuthName "Login webdav file server" # htdigest の realm パラメータにもなります
			AuthUserFile "/home/www-data/webdav/config/.htdigest" # digest 認証に使うファイル
			# Use RequireAll and RequireAny nestings to specify restrictions.
			<RequireAll>
				Require valid-user # digest 認証に成功した場合を条件にします
				# Write more requirements here.
			</RequireAll>
		</Location>
	</VirtualHost>
</IfModule>
# vim: syntax=apache ts=4 sw=4 sts=4 sr noet
各ディレクティブとその設定は次のようになります。
| Directive | 説明 |
|---|---|
| VirtualHost | もし FQDN ごとに webdav をサービスする場合は _default_ の部分を書き換えて下さい。この例では port 番号 50443 を使う設定にしています。/etc/apache2/ports.conf にも Listen するポートの指定をします。既定のポート番号 443 のまま使うのであればポート番号は 443 のままにして下さい。 |
| ServerAdmin | 管理者のメールアドレスを指定します。 |
| DocumentRoot | webdav server のルートディレクトリを設定します。ここに共有名(このページの例では share)を含めない方が問題が起きにくいようです。共有名を含めてしまうと、ディレクトリ・ファイル作成で XML テキストの一部と思われる文字が、ディレクトリ・ファイルに紛れ込むことがありました。 |
| ErrorLog | エラーログを格納するファイルを指定します。webdav はアクセス頻度が高いので十分に容量を確保できる場所を指定して下さい。古いログを整理してログ溢れが起きないような対策も必要です。書き出したログファイルを整理する logrotate または、ログを書き出すときにフィルタとして動作する rotatelogs を併用することを検討して下さい。cron あるいは systemd でログファイルの圧縮・削除・特異アクセスの監視も必要です。 |
| CustomLog | 同上。 |
| SSLEngine | on を指定して下さい。default-ssl.conf をひな形にしたならば、on になっているはずです。 |
| SSLCertificateFile | webdav server の証明書ファイルを指定します。 |
| SSLCertificateKeyFile | webdav server の鍵の対ファイルを指定します。 |
| BrowserMatch "RegularExpression" redirect-carefully | ログなどの解析により webdav client が response 301 (Moved Permanently) によって webdav サーバーにアクセスができないと思われる場合は、BrowserMatch の RegularExpression にログに残された User-agent 文字列を照合できる正規表現文字列を指定して下さい。複数の BrowserMatchディレクティブを書くことができます。以下参考にして下さい。 |
| Location | webdav server の共有ディレクトリ share 以下の設定を記述します。 |
| Options | webdav server を普通のブラウザでアクセスした場合でもファイル表示とコンテンツの閲覧ができるよう +Indexes を指定します。ネットを検索すると +Indexes を指定するとアクセスできなくなる Windows Client が有ると報告しているページが見つかります。問題が有るならば +Indexes を指定しないで下さい。 |
| Dav | on を指定して、Location ディレクティブで指定した path 以下で webdav 機能を有効にします。 |
| DavDepthInfinity | PROPFIND request で Infinity 無限にディレクトリを再帰探索するかどうか指定します。このページでは on を指定しました。ファイル数が多いあるいはディレクトリが深いなどの状況でサービス拒否(不全)攻撃を受けていると思われる場合は off を指定して下さい。 |
| AuthType | 認証方式を指定します。このページでは Digest を指定します。 認証するユーザーとそのパスワードを格納するファイルは htdigest で作成・更新します。 |
| AuthName | 認証で表示するメッセージを指定します。htdigest の realm パラメータにも AuthName と同じ文字列を指定します。 |
| AuthUserFile | 認証でユーザーとパスワードの対を参照するファイルを指定します。 |
| RequireAll, RequireAny | RequireAll で囲んだ条件は全て成立(AND)でアクセス可、RequireAny で囲んだ条件はどれか一つ成立(OR)でアクセス可、RequireAll, RequireAny をネストすることで複雑な条件にすることができます。ネスト順や深さは任意です。 |
| Require valid-user | アクセス許可の条件を書きます。valid-user は認証されたユーザーを許可します。 |
https (SSL) 接続ポートとして 50443 を使うため、/etc/apache2/ports を修正します。既定のポート 443 を使用するのであれば修正は不要です。ports.conf をダウンロードして使用するか、/etc/apache2/ports.conf を修正します。
# nano /etc/apache2/ports.conf
次は ports.conf 編集内容です。
# If you just change the port or add more ports here, you will likely also
# have to change the VirtualHost statement in
# /etc/apache2/sites-enabled/000-default.conf
Listen 80
<IfModule ssl_module>
	Listen 443
	Listen 50443  # 接続待ちポートを追加する
</IfModule>
<IfModule mod_gnutls.c>
	Listen 443
	Listen 50443  # 接続待ちポートを追加する
</IfModule>
# vim: syntax=apache ts=4 sw=4 sts=4 sr noet
ノート: Linux あるいは UNIX 系の OS ではポート番号 50443 は一般ユーザーの権限で接続待ちできます。セキュリティ的強化が必要な場合はポート番号 1024 未満で空いているポートを指定するのが良いでしょう。
/etc/apache2/mods-available/dav_fs.conf で webdav サービスで必要なロック情報を保持するファイルを指定します。修正しない場合は ${APACHE_LOCK_DIR}/DAVLock (APACHE_LOCK_DIR を展開すると /var/lock/apache2/DAVLock) に保持されます。 高頻度・多ユーザーのアクセス、ディレクトリ内に大量のファイルを配置するなど負荷が高くなると思われる状況であるならば、ロック情報を保持するファイルの格納場所について検討が必要です。以下のようなアクセス高速化を検討して下さい。
# nano /etc/apache2/mods-available/dav_fs.conf
次は dav_fs.conf 編集内容です。
DAVLockDB /home/www-data/webdav/var/DAVLock  # ロックファイルのパス

# vim: syntax=apache ts=4 sw=4 sts=4 sr noet
digest 認証でログインを試みるユーザーとそのパスワード照合するファイル .htdigest を作成します。ファイル名 .htdigest の後に続く文字列 "Login webdav file server" の部分はサイト設定ファイル /etc/apache2/sites-available/webdav-ssl.conf で DigestAuthName に指定した文字列と同じ文字列を指定します。この文字列を realm と言います。
次の例は webdav ユーザー dav-username を追加する例です。digest 認証、wevdav、ssl 接続を使えるようにするモジュールを有効にします。
# a2enmod auth_digest dav dav_fs dav_lock ssl
ノート: socache_shmcb は ssl module が依存しているモジュールとして自動的に有効になります。
webdav server を有効にします。
# a2ensite webdav-ssl
apache の設定ファイルが有効か検査します。間違いがあった場合でもサービスを継続できます。"Syntax OK" と表示されれば文法的な間違いはありません。ディレクトリ、ファイルなどのパスが存在しないなどの環境的な問題、Requre 条件が「絶対に満たされない」あるいは「意図しない条件でも満たされてしまう」などの論理的な問題は検査されません。結果が "Syntax OK" であっても、問題が発生するようであればディレクティブのパラメータに誤りが無いが見て下さい。
# apache2ctl configtest
apache を穏やかに再起動します。graceful を使って再起動するとサービス中の apache プロセスはリクエストが終わってから再起動します。サービスしていない apache プロセスは即座に再起動されます。
「おれおれ」信頼されたルート証明機関の証明書 /home/www-data/root-ca/my-root-ca.crt を PC にコピーしてインストールします。コピー方法はネットワーク経由、USB メモリ経由など手段はなんでも良いです。
手順の概略は、エクスプローラでコピーした my-root-ca.crt を閲覧 → ダブルクリック → [証明書のインストール(I)...] → 保存場所を 現在のユーザー(C) → [次へ(N)] → 証明書を全て次のストアに配置する(P) → [参照(R)...] で 信頼されたルート証明機関 を選択 → [OK] → [次へ(N)] → 証明書インポートウイザードの完了 で [OK] → セキュリティ警告に対して [OK]
以下スクリーンショットを交えて手順を示します。
PC にコピーした証明書をエクスプローラーで閲覧して、ダブルクリックまたは右クリックしてポップアップメニューの 証明書のインストール(I) をクリックします。
証明書のダイアログウインドウにある [証明書のインストール(I)...] をクリックします。
...] します。")
保存場所が 現在のユーザー(C) になっていることを確認して、 [次へ(N)] をクリックします。
 にします。ローカルコンピュータを選択すると管理者権限が必要になります。")
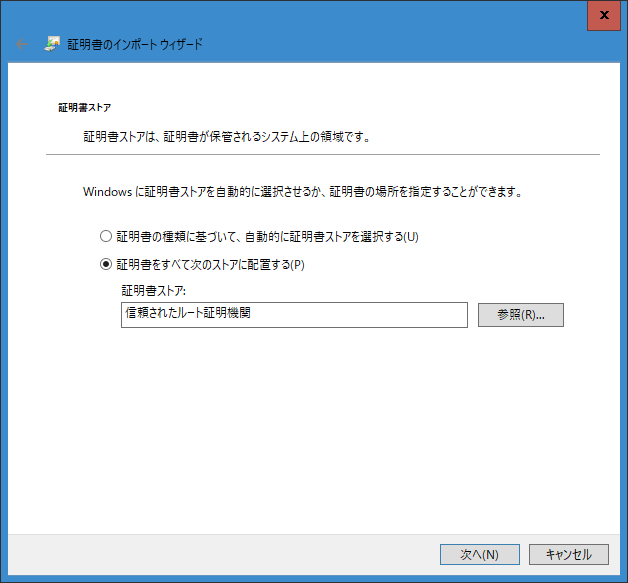
証明書を全て次のストアに配置する(P) をクリックして、[参照(R)...] をクリックします。

信頼されたルート証明機関 をクリックして、[OK] をクリックします。

証明書を全て次のストアに配置する(P)、証明書ストアが 信頼されたルート証明機関 になっていることを確認して [次へ(N)] をクリックします。
完了(F) をクリックして証明書のインポートを終了します。

セキュリティ警告が出た場合は [はい(Y)] をクリックしてインストールします。
] をクリックします。")
「正しくインポートされました。」とダイアログが表示されたら [OK] をクリックします。

certutil コマンドで信頼されたルート証明機関の証明書をインストールしします。my-root-ca.crt の部分は PC にコピーしたファイル名のフルパスに置き換えて下さい。
> certutil -user -addstore "Root" my-root-ca.crt
Windows PC で webdav server のストレージをマウントする(エクスプローラでアクセスする)ために使われる WebClient サービスを自動起動に設定します。この設定をしなくても普通に webdav server のストレージを扱えるはずです。起動のかなり早い段階から webdav server を使う、webdav server にアクセスしたときの待ち時間を短くしたいなどの都合がある場合は設定しておいた方が良いでしょう。
GUI を使って設定するか、コマンドラインで設定できます。
手順の概略は、Cortana または (Start Menu → ファイル名を指定して実行(R)) → services.msc と入力して検索か [OK] をクリックする → リストから WebClient を見つけてダブルクリックする (または 右クリック → プロパティ) → スタートアップの種類(E): 自動 → [OK]です。
以下スクリーンショットを交えて手順を示します。
スタートメニュー を右クリックして ファイル名を指定して実行(R) を選ぶ。

名前の所に services.msc を入力して [OK] をクリックする。

サービスコンソールで WebClient サービスを見つけてタブルクリックする。あるいは右クリックしてポップアップメニューを開き プロパティ を選択する [OK] をクリックする。

スタートアップの種類を 自動 に変えて [OK] をクリックする。

管理者として実行した cmd シェル(Power Shell から cmd を起動して下さい)にて次のコマンドを実行して下さい。START_TYPE が 2 AUTO_START になっていることを確認して下さい。
> sc config WebClient start=auto
> sc qc WebClient
[SC] QueryServiceConfig SUCCESS
SERVICE_NAME: WebClient
        TYPE               : 20  WIN32_SHARE_PROCESS
		START_TYPE         : 2   AUTO_START
        ERROR_CONTROL      : 1   NORMAL
        BINARY_PATH_NAME   : C:\WINDOWS\system32\svchost.exe -k LocalService -p
        LOAD_ORDER_GROUP   : NetworkProvider
        TAG                : 0
        DISPLAY_NAME       : WebClient
        DEPENDENCIES       : MRxDAV
        SERVICE_START_NAME : NT AUTHORITY\LocalService
Windows PC にネットワークの場所をアクセスするショートカットを追加します。エクスプローラを開き、左のペインにある PC を右クリックします。[OK] をクリックします。ポップアップメニューの ネットワークの場所を追加する(L) をクリックします。

ダイアログウインドウに説明が表示されます。[次へ(N)] をクリックします。
] で進める")
カスタムのネットワークの場所 をクリックして、[次へ(N)] をクリックします。
] で進める")
インターネットまたはネットワークのアドレス(A)に \\wevdav-server@SSL@port-number\share-name を入力して、[次へ(N)] をクリックします。
wevdav-server はサーバー名です。サーバーで samba(nmbd) を動かして名前解決できるようにしておくか、DNS、hosts file で名前を解決できるようにして下さい。名前解決手段が無い場合は IP address を指定します。port-number は wevdav サービスに接続するためのポート番号です。標準の SSL 接続ならば 443 で、省略可能です。このページの例のようにポート番号を 50443 に変える場合は @ に続けてポート番号を指定します。 share-name は共有名です。このページの例は share です。

初めて接続するか、認証情報が無い場合は、認証を求められます。ユーザー名とパスワードを入力して下さい。wevdab server で .htdigest ファイルに登録したユーザー名とパスワードです。資格情報を記憶する にチェックを付ける/付けないは任意です。[OK] をクリックします。

ショートカットの名前(T)を確認します。別の名前を付けることもできます。[次へ(N)] をクリックします。

[完了(F)] をクリックします。
] をクリックしてショートカットの作成を終了します。")
再び、あるいは認証情報の記憶状況によって接続の認証を求められます。ユーザー名とパスワードを入力して下さい。wevdab server で .htdigest ファイルに登録したユーザー名とパスワードです。資格情報を記憶する にチェックを付ける/付けないは任意です。[OK] をクリックします。
ノート: 資格情報を記憶しても、ログオフ-ログオンまたは再起動後は再びユーザー名とパスワードを入力する必要があります。この時ユーザー名、パスワードは記憶されています。この時も資格情報を記憶するようにチェックを付けておいた方が良いでしょう。
ノート: \\server-name@SSL@port-number\share-name でアクセスできず https://server-name:port-number/share-name/ でアクセスできる場合は WebClient サービスを一度 停止-開始 してみて下さい。
webdav server の共有ディレクトリをドライブに割り当て使うことができます。エクスプローラで操作するのが簡単です。コマンドラインで割り当てをするには次の様にします。既に割り当てが有るかもしれないので一旦割り当てを解除します。D: 解除するドライブです。
> net use D: /delete
割り当ては次の様にします。password を省略して対話的に password を入力することもできます。
> net use D: \\server-name@SSL@port-number\share-name /user:user-name password
ドライブに割り当てた webdav server の共有ディレクトリはログオン時に自動的に再接続されません。/PERSISTENT:YES と /SAVECRD オプションは効力を発揮しません。ログオン時に実行されるバッチファイルを作成して wevdav server の共有ディレクトリをドライブに割り当てるのが便利です。しかし、バッチファイルの中にパスワードを直接書くことになるのでアクセス許可を設定して他のユーザーが読めないようにするなど工夫が必要です。画面やキーボードを直接操作して覗き見される可能性は防ぐことができません。想定される利用状況でセキュリティ的に問題が無いか検討が必要です。
Mail@to_afuruta@m7.dion.ne.jp